키보드 단축키
개요
이 기능을 사용하면 Electron 애플리케이션에서 로컬 및 전역 키보드 단축키를 설정할 수 있다.
예제
로컬 단축키
로컬 키보드 단축키는 애플리케이션이 포커스 상태일 때만 작동한다. 로컬 키보드 단축키를 설정하려면 Menu 모듈 내에서 MenuItem을 생성할 때 accelerator 속성을 지정해야 한다.
튜토리얼 시작 코드에서 제공하는 동작하는 애플리케이션을 기반으로 main.js를 다음과 같이 업데이트한다:
- main.js
- index.html
const { app, BrowserWindow, Menu, MenuItem } = require('electron/main')

function createWindow () {
  const win = new BrowserWindow({
    width: 800,
    height: 600
  })

  win.loadFile('index.html')
}

const menu = new Menu()
menu.append(new MenuItem({
  label: 'Electron',
  submenu: [{
    role: 'help',
    accelerator: process.platform === 'darwin' ? 'Alt+Cmd+I' : 'Alt+Shift+I',
    click: () => { console.log('Electron rocks!') }
  }]
}))

Menu.setApplicationMenu(menu)

app.whenReady().then(createWindow)

app.on('window-all-closed', () => {
  if (process.platform !== 'darwin') {
    app.quit()
  }
})

app.on('activate', () => {
  if (BrowserWindow.getAllWindows().length === 0) {
    createWindow()
  }
})
<!DOCTYPE html>
<html>
<head>
    <meta charset="UTF-8">
    <title>Hello World!</title>
    <meta http-equiv="Content-Security-Policy" content="script-src 'self' 'unsafe-inline';" />
</head>
<body>
    <h1>Hello World!</h1>
    <p>Hit Alt+Shift+I on Windows, or Opt+Cmd+I on mac to see a message printed to the console.</p>
</body>
</html>
참고: 위 코드에서 accelerator는 사용자의 운영체제에 따라 다르게 설정된다. MacOS에서는
Alt+Cmd+I이고, Linux와 Windows에서는Alt+Shift+I이다.
Electron 애플리케이션을 실행한 후, 방금 정의한 로컬 단축키와 함께 애플리케이션 메뉴를 확인할 수 있다:
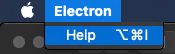
Help를 클릭하거나 정의한 단축키를 누른 후, Electron 애플리케이션을 실행한 터미널을 열면 click 이벤트가 발생한 후 생성된 메시지 "Electron rocks!"를 확인할 수 있다.
전역 단축키 설정
전역 키보드 단축키를 설정하려면 globalShortcut 모듈을 사용해야 한다. 이 모듈은 애플리케이션이 키보드 포커스를 갖지 않았을 때도 키보드 이벤트를 감지할 수 있다.
tutorial starter code에서 제공하는 동작 중인 애플리케이션을 시작점으로 삼아 main.js 파일을 다음과 같이 업데이트한다:
- main.js
- index.html
const { app, BrowserWindow, globalShortcut } = require('electron/main')

function createWindow () {
  const win = new BrowserWindow({
    width: 800,
    height: 600
  })

  win.loadFile('index.html')
}

app.whenReady().then(() => {
  globalShortcut.register('Alt+CommandOrControl+I', () => {
    console.log('Electron loves global shortcuts!')
  })
}).then(createWindow)

app.on('window-all-closed', () => {
  if (process.platform !== 'darwin') {
    app.quit()
  }
})

app.on('activate', () => {
  if (BrowserWindow.getAllWindows().length === 0) {
    createWindow()
  }
})
<!DOCTYPE html>
<html>
<head>
    <meta charset="UTF-8">
    <title>Hello World!</title>
    <meta http-equiv="Content-Security-Policy" content="script-src 'self' 'unsafe-inline';" />
</head>
<body>
    <h1>Hello World!</h1>
    <p>Hit Alt+Ctrl+I on Windows or Opt+Cmd+I on Mac to see a message printed to the console.</p>
</body>
</html>
참고: 위 코드에서
CommandOrControl조합은 macOS에서는Command를, Windows/Linux에서는Control을 사용한다.
Electron 애플리케이션을 실행한 후, 정의한 키 조합을 누르고 Electron 애플리케이션을 실행한 터미널을 열면, 'Electron loves global shortcuts!'라는 메시지를 확인할 수 있다.
BrowserWindow 내에서 단축키 사용하기
웹 API 활용하기
BrowserWindow 내에서 키보드 단축키를 처리하려면, 렌더러 프로세스에서 addEventListener() API를 사용해 keyup과 keydown DOM 이벤트를 감지할 수 있다.
- main.js
- index.html
- renderer.js
// Modules to control application life and create native browser window
const { app, BrowserWindow } = require('electron/main')

function createWindow () {
  // Create the browser window.
  const mainWindow = new BrowserWindow({
    width: 800,
    height: 600
  })

  // and load the index.html of the app.
  mainWindow.loadFile('index.html')
}

// This method will be called when Electron has finished
// initialization and is ready to create browser windows.
// Some APIs can only be used after this event occurs.
app.whenReady().then(() => {
  createWindow()

  app.on('activate', function () {
    // On macOS it's common to re-create a window in the app when the
    // dock icon is clicked and there are no other windows open.
    if (BrowserWindow.getAllWindows().length === 0) createWindow()
  })
})

// Quit when all windows are closed, except on macOS. There, it's common
// for applications and their menu bar to stay active until the user quits
// explicitly with Cmd + Q.
app.on('window-all-closed', function () {
  if (process.platform !== 'darwin') app.quit()
})
<!DOCTYPE html>
<html>
  <head>
    <meta charset="UTF-8">
    <!-- https://developer.mozilla.org/en-US/docs/Web/HTTP/CSP -->
    <meta http-equiv="Content-Security-Policy" content="default-src 'self'; script-src 'self'">
    <meta http-equiv="X-Content-Security-Policy" content="default-src 'self'; script-src 'self'">
    <title>Hello World!</title>
  </head>
  <body>
    <h1>Hello World!</h1>

    <p>Hit any key with this window focused to see it captured here.</p>
    <div><span>Last Key Pressed: </span><span id="last-keypress"></span></div>
    <script src="./renderer.js"></script>
  </body>
</html>
function handleKeyPress (event) {
  // You can put code here to handle the keypress.
  document.getElementById('last-keypress').innerText = event.key
  console.log(`You pressed ${event.key}`)
}

window.addEventListener('keyup', handleKeyPress, true)
참고: 세 번째 매개변수
true는 이 리스너가 항상 다른 리스너보다 먼저 키 입력을 받도록 설정한다. 따라서 다른 리스너에서stopPropagation()을 호출해도 영향을 받지 않는다.
메인 프로세스에서 이벤트 가로채기
before-input-event 이벤트는 페이지에서 keydown과 keyup 이벤트를 전달하기 전에 발생한다. 이 이벤트를 사용해 메뉴에 표시되지 않는 커스텀 단축키를 잡아내고 처리할 수 있다.
튜토리얼 스타터 코드에서 기본 애플리케이션을 시작한 후, main.js 파일을 다음과 같이 업데이트한다:
- main.js
- index.html
const { app, BrowserWindow } = require('electron/main')

app.whenReady().then(() => {
  const win = new BrowserWindow({ width: 800, height: 600 })

  win.loadFile('index.html')
  win.webContents.on('before-input-event', (event, input) => {
    if (input.control && input.key.toLowerCase() === 'i') {
      console.log('Pressed Control+I')
      event.preventDefault()
    }
  })
})
<!DOCTYPE html>
<html>
<head>
    <meta charset="UTF-8">
    <title>Hello World!</title>
    <meta http-equiv="Content-Security-Policy" content="script-src 'self' 'unsafe-inline';" />
</head>
<body>
    <h1>Hello World!</h1>
    <p>Hit Ctrl+I to see a message printed to the console.</p>
</body>
</html>
Electron 애플리케이션을 실행한 후, 애플리케이션을 실행한 터미널에서 Ctrl+I 키 조합을 누르면 이 키 조합이 성공적으로 가로챈 것을 확인할 수 있다.
서드파티 라이브러리 활용
단축키를 수동으로 파싱하고 싶지 않다면, mousetrap과 같은 고급 키 감지 기능을 제공하는 라이브러리를 사용할 수 있다. 아래는 렌더러 프로세스에서 mousetrap을 사용하는 예제다:
Mousetrap.bind('4', () => { console.log('4') })
Mousetrap.bind('?', () => { console.log('show shortcuts!') })
Mousetrap.bind('esc', () => { console.log('escape') }, 'keyup')

// 조합키
Mousetrap.bind('command+shift+k', () => { console.log('command shift k') })

// 여러 조합을 동일한 콜백에 매핑
Mousetrap.bind(['command+k', 'ctrl+k'], () => {
  console.log('command k or control k')

  // 기본 동작을 막고 이벤트 버블링을 중단하려면 false 반환
  return false
})

// Gmail 스타일 시퀀스
Mousetrap.bind('g i', () => { console.log('go to inbox') })
Mousetrap.bind('* a', () => { console.log('select all') })

// 코나미 코드!
Mousetrap.bind('up up down down left right left right b a enter', () => {
  console.log('konami code')
})