다크 모드
개요
운영체제 UI 자동 업데이트
"네이티브 인터페이스"는 파일 선택기, 윈도우 테두리, 대화 상자, 컨텍스트 메뉴 등 앱이 아닌 운영체제에서 제공하는 모든 UI를 포함한다. 기본적으로는 운영체제의 자동 테마 적용 기능을 사용한다.
앱에 다크 모드 기능이 있다면, 시스템의 다크 모드 설정과 동기화하여 켜고 끌 수 있다. 이때 prefers-color-scheme CSS 미디어 쿼리를 활용한다.
수동으로 인터페이스 업데이트하기
라이트/다크 모드를 수동으로 전환하려면 nativeTheme 모듈의 themeSource 속성에 원하는 모드를 설정하면 된다. 이 속성의 값은 렌더러 프로세스로 전파된다. prefers-color-scheme와 관련된 모든 CSS 규칙이 이에 따라 업데이트된다.
macOS 설정
macOS 10.14 Mojave에서 Apple은 모든 macOS 컴퓨터를 위한 새로운 시스템 전체 다크 모드를 도입했다. 만약 여러분의 Electron 앱이 다크 모드를 지원한다면, nativeTheme API를 사용해 시스템 전체 다크 모드 설정을 따르도록 할 수 있다.
macOS 10.15 Catalina에서는 모든 macOS 컴퓨터를 위한 새로운 "자동" 다크 모드 옵션이 추가되었다. Catalina에서 nativeTheme.shouldUseDarkColors와 Tray API가 이 모드에서 올바르게 동작하려면, Electron >=7.0.0을 사용하거나 이전 버전에서는 Info.plist 파일에서 NSRequiresAquaSystemAppearance를 false로 설정해야 한다. Electron Packager와 Electron Forge는 앱 빌드 시 Info.plist 변경을 자동화하는 darwinDarkModeSupport 옵션을 제공한다.
Electron 8.0.0 이상을 사용하면서 이 기능을 사용하지 않으려면, Info.plist 파일에서 NSRequiresAquaSystemAppearance 키를 true로 설정해야 한다. 단, Electron 8.0.0 이상은 macOS 10.14 SDK를 사용하기 때문에 이 테마 설정을 비활성화할 수 없다는 점에 유의해야 한다.
예제
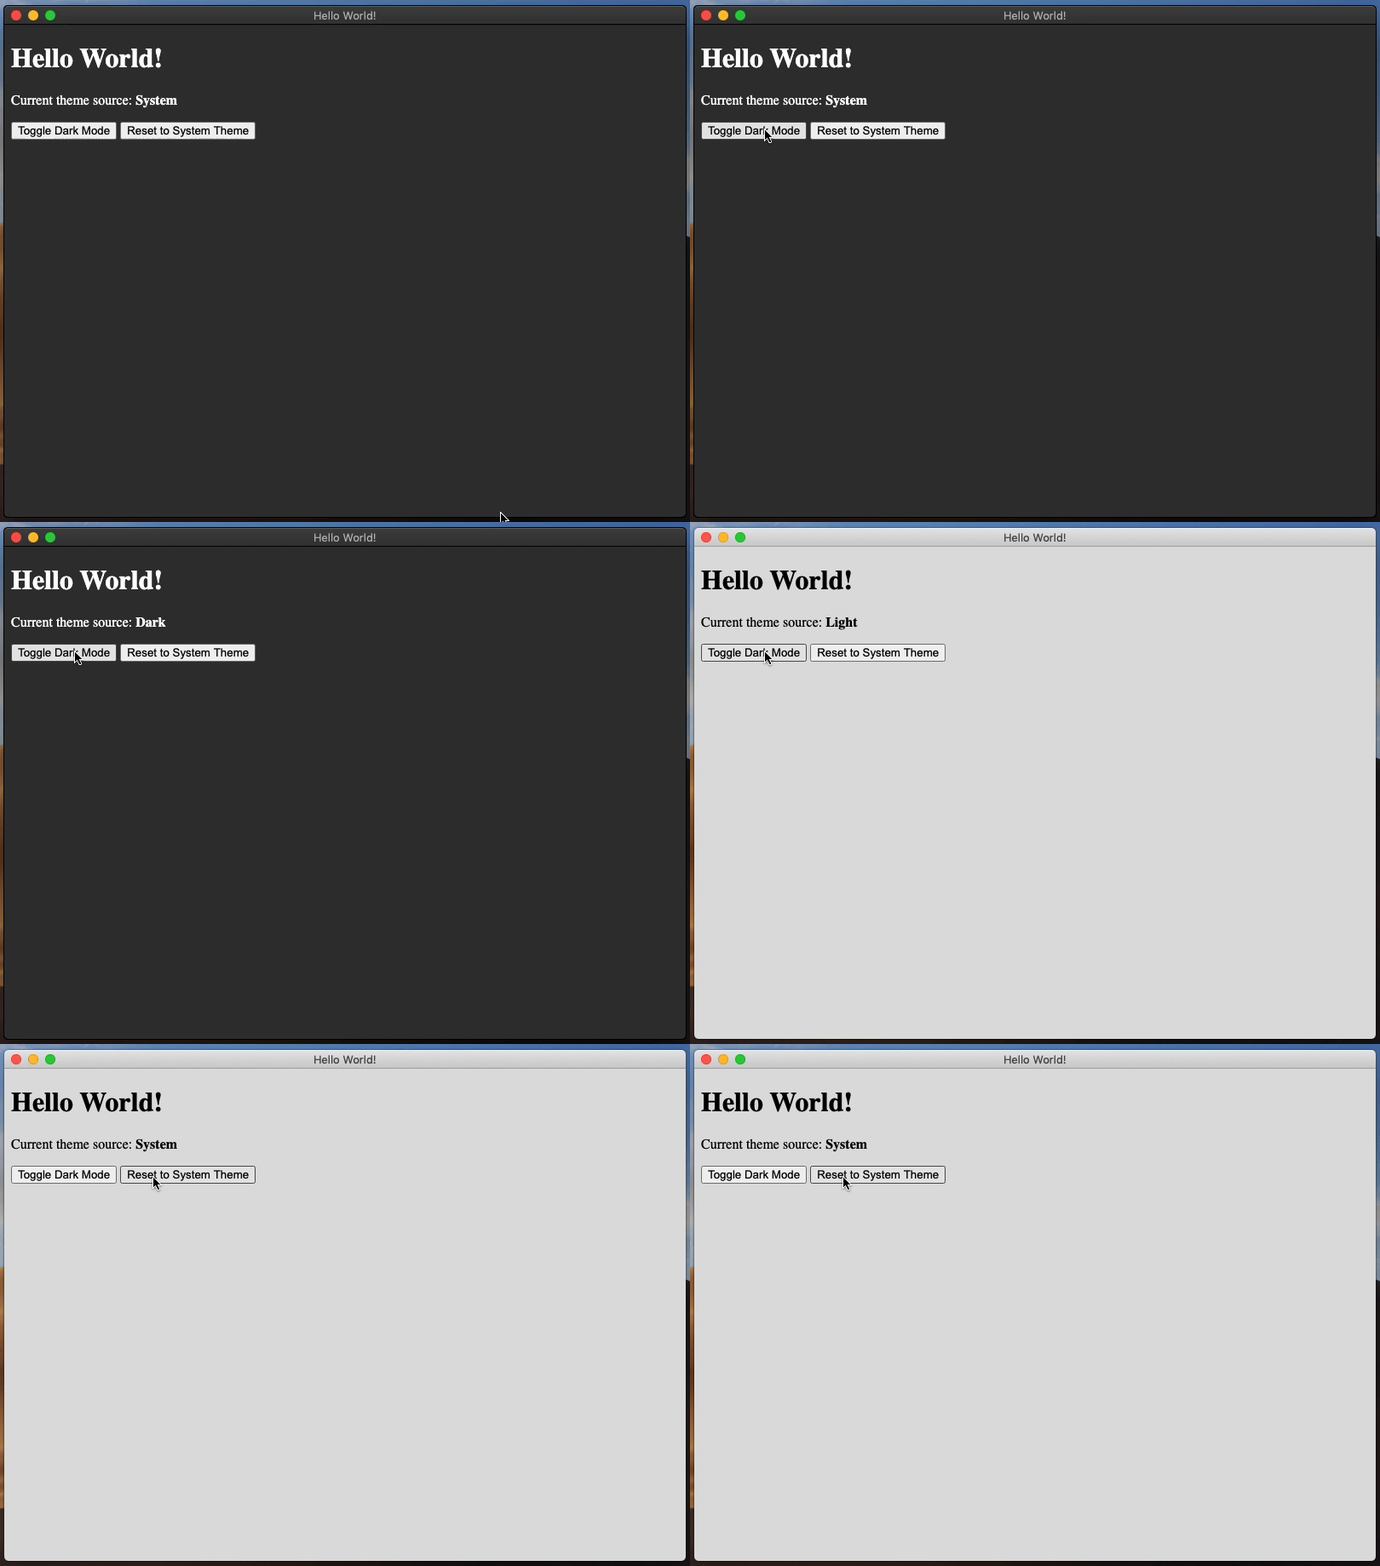
이 예제는 nativeTheme에서 테마 색상을 가져오는 Electron 애플리케이션을 보여준다. 또한 IPC 채널을 사용해 테마 토글과 리셋 컨트롤을 제공한다.
- main.js
- preload.js
- index.html
- renderer.js
- styles.css
const { app, BrowserWindow, ipcMain, nativeTheme } = require('electron/main')
const path = require('node:path')

function createWindow () {
  const win = new BrowserWindow({
    width: 800,
    height: 600,
    webPreferences: {
      preload: path.join(__dirname, 'preload.js')
    }
  })

  win.loadFile('index.html')
}

ipcMain.handle('dark-mode:toggle', () => {
  if (nativeTheme.shouldUseDarkColors) {
    nativeTheme.themeSource = 'light'
  } else {
    nativeTheme.themeSource = 'dark'
  }
  return nativeTheme.shouldUseDarkColors
})

ipcMain.handle('dark-mode:system', () => {
  nativeTheme.themeSource = 'system'
})

app.whenReady().then(() => {
  createWindow()

  app.on('activate', () => {
    if (BrowserWindow.getAllWindows().length === 0) {
      createWindow()
    }
  })
})

app.on('window-all-closed', () => {
  if (process.platform !== 'darwin') {
    app.quit()
  }
})
const { contextBridge, ipcRenderer } = require('electron/renderer')

contextBridge.exposeInMainWorld('darkMode', {
  toggle: () => ipcRenderer.invoke('dark-mode:toggle'),
  system: () => ipcRenderer.invoke('dark-mode:system')
})
<!DOCTYPE html>
<html>
<head>
    <meta charset="UTF-8">
    <title>Hello World!</title>
    <meta http-equiv="Content-Security-Policy" content="script-src 'self' 'unsafe-inline';" />
    <link rel="stylesheet" type="text/css" href="./styles.css">
</head>
<body>
    <h1>Hello World!</h1>
    <p>Current theme source: <strong id="theme-source">System</strong></p>

    <button id="toggle-dark-mode">Toggle Dark Mode</button>
    <button id="reset-to-system">Reset to System Theme</button>

    <script src="renderer.js"></script>
</body>
</html>
document.getElementById('toggle-dark-mode').addEventListener('click', async () => {
  const isDarkMode = await window.darkMode.toggle()
  document.getElementById('theme-source').innerHTML = isDarkMode ? 'Dark' : 'Light'
})

document.getElementById('reset-to-system').addEventListener('click', async () => {
  await window.darkMode.system()
  document.getElementById('theme-source').innerHTML = 'System'
})
:root {
  color-scheme: light dark;
}

@media (prefers-color-scheme: dark) {
  body { background: #333; color: white; }
}

@media (prefers-color-scheme: light) {
  body { background: #ddd; color: black; }
}
index.html 파일부터 시작해보자:
<!DOCTYPE html>
<html>
<head>
    <meta charset="UTF-8">
    <title>Hello World!</title>
    <meta http-equiv="Content-Security-Policy" content="script-src 'self' 'unsafe-inline';" />
    <link rel="stylesheet" type="text/css" href="./styles.css">
</head>
<body>
    <h1>Hello World!</h1>
    <p>Current theme source: <strong id="theme-source">System</strong></p>

    <button id="toggle-dark-mode">Toggle Dark Mode</button>
    <button id="reset-to-system">Reset to System Theme</button>

    <script src="renderer.js"></script>
</body>
</html>
styles.css 파일은 다음과 같다:
@media (prefers-color-scheme: dark) {
  body { background: #333; color: white; }
}

@media (prefers-color-scheme: light) {
  body { background: #ddd; color: black; }
}
이 예제는 몇 가지 엘리먼트를 가진 HTML 페이지를 렌더링한다. <strong id="theme-source"> 엘리먼트는 현재 선택된 테마를 보여주고, 두 개의 <button> 엘리먼트는 컨트롤 역할을 한다. CSS 파일은 prefers-color-scheme 미디어 쿼리를 사용해 <body> 엘리먼트의 배경색과 글자색을 설정한다.
preload.js 스크립트는 window 객체에 darkMode라는 새로운 API를 추가한다. 이 API는 'dark-mode:toggle'과 'dark-mode:system'이라는 두 개의 IPC 채널을 렌더러 프로세스에 노출한다. 또한 toggle과 system이라는 두 메서드를 할당해 렌더러 프로세스에서 메인 프로세스로 메시지를 전달한다.
const { contextBridge, ipcRenderer } = require('electron')

contextBridge.exposeInMainWorld('darkMode', {
  toggle: () => ipcRenderer.invoke('dark-mode:toggle'),
  system: () => ipcRenderer.invoke('dark-mode:system')
})
이제 렌더러 프로세스는 메인 프로세스와 안전하게 통신할 수 있으며, nativeTheme 객체에 필요한 뮤테이션을 수행할 수 있다.
renderer.js 파일은 <button>의 기능을 제어한다.
document.getElementById('toggle-dark-mode').addEventListener('click', async () => {
  const isDarkMode = await window.darkMode.toggle()
  document.getElementById('theme-source').innerHTML = isDarkMode ? 'Dark' : 'Light'
})

document.getElementById('reset-to-system').addEventListener('click', async () => {
  await window.darkMode.system()
  document.getElementById('theme-source').innerHTML = 'System'
})
addEventListener를 사용해 renderer.js 파일은 각 버튼 엘리먼트에 'click' 이벤트 리스너를 추가한다. 각 이벤트 리스너 핸들러는 window.darkMode API 메서드를 호출한다.
마지막으로, main.js 파일은 메인 프로세스를 나타내며 실제 nativeTheme API를 포함한다.
const { app, BrowserWindow, ipcMain, nativeTheme } = require('electron')
const path = require('node:path')

const createWindow = () => {
  const win = new BrowserWindow({
    width: 800,
    height: 600,
    webPreferences: {
      preload: path.join(__dirname, 'preload.js')
    }
  })

  win.loadFile('index.html')

  ipcMain.handle('dark-mode:toggle', () => {
    if (nativeTheme.shouldUseDarkColors) {
      nativeTheme.themeSource = 'light'
    } else {
      nativeTheme.themeSource = 'dark'
    }
    return nativeTheme.shouldUseDarkColors
  })

  ipcMain.handle('dark-mode:system', () => {
    nativeTheme.themeSource = 'system'
  })
}

app.whenReady().then(() => {
  createWindow()

  app.on('activate', () => {
    if (BrowserWindow.getAllWindows().length === 0) {
      createWindow()
    }
  })
})

app.on('window-all-closed', () => {
  if (process.platform !== 'darwin') {
    app.quit()
  }
})
ipcMain.handle 메서드는 HTML 페이지의 버튼 클릭 이벤트에 응답하는 메인 프로세스의 방법이다.
'dark-mode:toggle' IPC 채널 핸들러 메서드는 shouldUseDarkColors 불리언 프로퍼티를 확인하고, 해당 themeSource를 설정한 후 현재 shouldUseDarkColors 프로퍼티를 반환한다. 이 IPC 채널에 대한 렌더러 프로세스 이벤트 리스너를 다시 보면, 이 핸들러의 반환 값이 <strong id='theme-source'> 엘리먼트에 올바른 텍스트를 할당하는 데 사용된다.
'dark-mode:system' IPC 채널 핸들러 메서드는 themeSource에 'system' 문자열을 할당하고 아무것도 반환하지 않는다. 이는 관련 렌더러 프로세스 이벤트 리스너와도 일치하며, 이 메서드는 반환 값을 기대하지 않고 대기한다.
Electron Fiddle을 사용해 이 예제를 실행한 후 "Toggle Dark Mode" 버튼을 클릭하면 앱이 밝은 배경색과 어두운 배경색 사이를 번갈아가며 변경한다.